Gubb is a 3D Archaeological Display System (3DADS). It is designed to allow archaeologists to present findings to clients in a readily understandable and informative display.
It is intended to be as simple as possible to use - both for the archaeologist and the client. No knowledge of programing code is required in either case.
This tutorial is set to open in a separate browser window, so you can easily have both it and the Gubb program open at the same time - to follow the steps as they are set out below.
Back to top
The basic entity of the Gubb structure is the "client". This is the first thing you need to create to use Gubb.
Once a client record is created, the structure of the Gubb system can be represented as follows:
The Gubb system assumes that every artefact (sub-surface) is found in an excavation, every excavation is located on a site and every site is part of a project.
Consequently as each site is created, it is linked via a drop-down box in the input form to an existing project. In turn, each excavation is linked to a site and so on.
This is all by way of saying that an excavation cannot be displayed as a stand-alone object, in isolation. It has to be entered into the system in a context - as part of a project and site.
The user needs to start at the beginning:
Back to top
Log into the site through the login page. The forms and pages you need to use are only accessible by logging in via that page.
Completion of the login process will open the Control Panel.
Scroll to the bottom of the page - to the "Sundries" section of the Control Panel.
Select the "Enter New Client" button.
Enter the required information about the client using the form that opens.
Take note of the username and password you allocate to the client - you will need to provide these to the client so they can view their sites and excavations on the system. They will also need the access code you create for each site (see below).
The top section of the Control Panel is the "Create New" section.
Select the "Create New Project" button from that section.
This opens the "Create New Project" input form.
Only the first two fields of this form are "required" (i.e. must be filled out for the form to be submitted). The other fields are there for your convenience, if you wish to use them. If not, by all means, leave them blank.
Once the form is filled out, click on the "Add This Record" button at the bottom of the form.
When the record is successfully created the page will close and you will be re-directed automatically to a confirmation page. The details of the record you have added are displayed on this page.
Check the details shown. If any are incorrect, return to the Main Control Panel and select "Edit Existing Project" to correct them.
If the details of the project are correct, however, select "Return to Control Panel" to proceed to the next step.
Back to top
Open the main Gubb Control Panel. From the top section, select the "Create New Site" button.
The "Add A New Site" form will open.
Select the project that includes this site from the drop-down list at the top of the form.
If the project that includes this site does not appear in the drop-down list, go to step 1 (above) and create the project.
Otherwise, complete the rest of the form. The address details, longitude and latitude are not required, but the Google Maps display will not work if they are not entered.
Getting the longitude and latitude of a location could not be simpler if you have access to Google Maps - see the FAQ on getting coordinates below.
There are a number of different ways of expressing latitude and longitude coordinates. For the Gubb system, however, it is recommended that the Signed Degrees format (DDD.dddd) be used as shown in the "How to get coordinates" FAQ below - as this is the default setting of Google Maps.
That said, however, it is entirely up to you whether you use them at all and, if so, in what format.
Gubb deals exclusively in rectangles.
That is not to say that your site must necessarily be rectangular in shape. The Gubb site, however will actually be the rectangular shape that encompasses the irregular shape of the actual site. For example, your site may be an inverted "L" shape as represented in the following image:
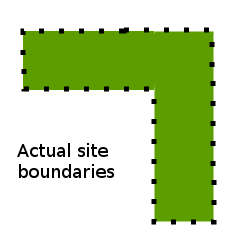
In this example, the actual site boundaries are represented by the black dotted line enclosing the green area.
In order to display the site in Gubb, however, the notional site boundaries need to be treated as follows:
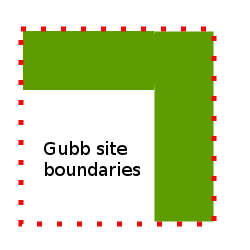
The notional site boundaries are formed by a rectangle that encloses the entire site, whatever its actual shape - as the red dotted line encloses the green area in the above example.
The position of Above Ground Artefacts and Excavations will be determined by measuring from these notional boundaries.
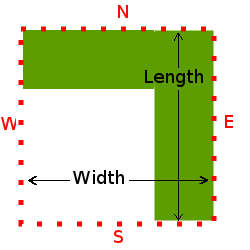
Site width is the length of the east - west axis of the site. The site length is the length of the north - south axis.
The final field on the form asks for the file name of an image for the background of the site map: the "Site Image File Name" input field.
If you do not have an image ready, you can leave this field blank - a default image will be displayed showing that "no image is currently available".
If you want to make an image from Google Maps, see the "Make a Site Image" FAQ below.
If you have an image ready, however, simply place the file name in this input field for the moment. The image itself will be uploaded using another form - as set out below. Putting the filename in this box simply tells Gubb which site that image belongs to so it can be displayed.
It is vital that you copy the file name into this input accurately. Remember, file names are case sensitive, so, for example, "pic-1.jpg" is a different file than "Pic-1.jpg".
Please note that this case sensitivity extends to the suffix which defines the file type (e.g. ".jpg").
To further illustrate, "site-1.jpg" will be treated as a different file than "site-1.JPG" for example. This becomes an issue as some applications (e.g. ms Paint, Cannon PictureProject) assign file types in capitals. If you know about it, then it's not a problem. Either change the file extension before uploading - or simply make sure the file extensions match on the name you put in the form and the file that you actually upload.
When you have filled the form out, click the "Add This Record" button at the bottom of the form.
This will open the New Site Confirmation page - which shows the data which has been added to the database. Check the entry. If any of the inputs are incorrect, go to "Control Panel", select "Edit Site" and make any corrections that are required.
If the entries are correct, however, proceed to the next step.
Back to top
If you have an image ready to upload, you can select the "Upload Site Image" button at the bottom of the Site Data Entry Confirmation page. Alternatively, you can select the "Upload Site Image" button in the second from bottom section of the main Control Panel. Both links access the same page.
Once the "Upload Site Image" form is displayed, simply follow the directions on the page - select an image from any directory on your computer or device, click on the "Open" button in the dialogue box, and then click on the "Upload Image" button.
Images should be less than 2 MB in size (file size). This can easily be achieved by re-sizing and optimising the image.
You can re-size an image using any graphics application - ms Paint, for example. Right click on the image file in Windows Explorer (or equivalent). Select "Open with" and then select "Paint" from the menu that appears.
First of all, crop the image so the sides roughly correspond with the boundaries of the site. Then select "Resize and Skew" from the controls at the top of the Paint screen and you can set the image to whatever size you want. The optimal width for a Gubb site image is 700px. Gubb will scale the height of the image to whatever it needs to be.
See "Make a Site Image" in the FAQ below for more detail - and "How to Optimise an Image" in the FAQ section to see how to further reduce the file size of your images - to store more images and reduce download times.
Back to top
An Above Ground Artefact is anything built or placed on the site that is above the surface: a shed, a water tank, a car body, etc.
To enter one into Gubb, open the main Control Pane and select "Create Above Ground Artefact".
This opens the "Add a New AGA" form.
Once the form is open, the first input field requires the user to select a site that this AGA is to be assigned to.
It is important that you select the correct site from the drop-down list. If no selection is made, the AGA will be assigned to the site at the top of the list - the most recent one created.
The next field requests the unit of measurement used to position the AGA on the site - select either millimetres, centimetres or metres from the drop-down list. If no selection is made, millimetres will be selected from the top of the list.
The unit of measurement defines the values entered in the "X" and "Y" position fields and also the ZPosition field which represents the height of the top of the artefact above ground level.
The XPosition represents the distance from the western or left side of the site, the YPosition is the distance from the north, or top. Remember the dimensions of the site were set when you created the site in 2. (above). Consequently, the distances measured are from the notional boundaries of the site, as described in that section.
The next field requests a description of the artefact. This should be brief - a couple of words, as it is displayed as a label for the artefact on the Site Display. Consequently, short descriptions such as "Tin Shed" or "Water Tank" are recommended.
Back to top
Once you have clicked on the "Create New Excavation" button on the Control Panel, the add new excavation form will open.
The first field is a drop down which requires you to select a site that the excavation will be located on. If no selection is made, the default selection is the last site entered - the one appearing on the top of the drop-down list.
This list displays all the sites available on the instance of Gubb. If the site you require does not appear, go to "Create New Site" above and add the site you require.
The same conventions are used for excavations as are used for the treatment of sites in "Site Dimensions and Shape" above.
To summarise; each Gubb excavation is assumed to be a rectangular cuboid. If the actual excavation is an irregular shape, then the Gubb representation will be the smallest rectangular cuboid (or cube) that will contain the actual excavation.
The purpose of this simplified presentation is the stated objective of offering a system which is simple to operate - which doesn't require either knowledge of code or hours of work to use.
The next field invites you to enter an "Excavation Code". This is basically the name or ID of the excavation - that will delineate it from other excavations on the same site - and those on other sites.
As Gubb lists excavations for a number of purposes - sometimes together with excavations from separate sites, it is recommended that you adopt a naming convention for excavations that obviously links them with a particular site. The name "SWT-001" for example, comprises the initials of the site "Sunshine Water Tower" and a number ("-001") which delineates it from the other excavations on that site.
Again, the system you use is entirely up to you, but you should use one.
The next two fields require the distance from the northern and then western boundaries of the site respectively.
Both distances must be entered in metres.
Default setting is 0.
The distances are measured to the top left corner of the excavation (north-west corner).
The angle requested by the next input field is the approximate angle that the east/west axis of the excavation differs from the same axis of the entire site.
It is used to position the model of the excavation on the Gubb site display.
The default setting is 0.
The angle is entered as a plain number - no degrees symbol is required.
It is suggested that any entry should be less than 45. After 45 degrees, arguably the northern boundary has actually become the eastern boundary, for example. A review of the classification of your boundaries and sides may be more appropriate.
The last four input boxes set out the dimensions of the excavation itself.
The first of these is used to set the unit of measurement for the excavation - millimetres, centimetres or metres.
The default setting is millimetres. Gubb will convert any measurements entered back to millimetres for the purposes of its calculations. They will be displayed, however, in the units selected and entered.
Again, the unit of measurement used is entirely up to you (provided it is metric). There is however, a good reason to get into the habit of using millimetres and metres - for the same reason they are exclusively used in the building industry.
House plans, for example, are always drawn using these measurements.
Thus, to a carpenter, a three metre piece of wood is a "three-oh".And when the carpenter asks the apprentice to lop off a small piece of wood, he will call out for "a hundred and fifty" - and even the apprentice will know that he or she didn't mean metres.
If centimetres are used, however, confusion can easily set in. "A hundred and fifty," for example, can now mean 150 mm, or 1.5 m.
It is therefore suggested that the same conventions would be sensible in the archaeological field - metres for things bigger than a house, millimetres for the rest.
The conventions regarding the sides or axes of the excavation are again the same as those used in the setting out of the site and are explained on the form.
Back to top
For Gubb's purposes, Artefacts are defined as being those things which might be discovered in an excavation that have never been organic in nature. For example, a stone tool, being made of stone, would be an artefact, while a piece of petrified wood, on the other hand, was once organic matter, and therefore would be categorised as "remains." The boundaries of the definition you use, however, are entirely up to you; the distinction only exists at all to make use of the two color options for different type of artefacts (and fields). However best these colors can be used to highlight your work, that's how they should be used.
To start with, however, it is recommended that the above Gubb definition be used.
Back to top
Open Google Maps and find the location you want to get the coordinates for.
Place the cursor on that position and right click if using a mouse or pad, tap and hold if you are using a touch screen. A dialogue box containing a menu will appear:
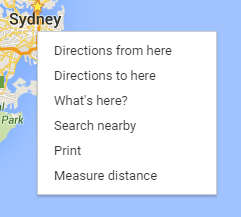
Click on the "What's here?" link.
A further dialogue box will open at the bottom of your screen - and at the bottom of that box are the latitude and longitude, as shown in the image below. The latitude is the first number. Copy and paste away!

Back to top
Back to top
Back to top