A set of instructions for the clients of archaeologists using the Gubb system to display their findings.
After clicking the "Client Login" button, the first screen that will open for you is the "captcha"" form.
This form acts as a shield preventing "brute force" attacks on the username and password login that follows.
The captcha question asks you to enter the number of sides the displayed shape has. The answer must be entered in a word, not a numeral. The form is not case sensitive.
Type the answer and then click the "Enter" button.
Back to top
Completeion of th "captcha" opens the Client Login form.
This requires you to enter your username and password. Then click the enter button.
Back to top
This in turn opens the dialogue box to select the project you wish to view.
The drop-down list in the form displays all the projects being undertaken for the client who has logged in.
Select the project you wish to view from this list.
Then enter the "Access Code" that you have been supplied with for this project.
If you do not have this code, you will need to contact your archaeologist. Each project has its own code to ensure only authorised parties have access to the results.
Enter the code and click the "Enter This Project" button.
Back to top
The Access Code provides access to all the sites that form the project you have selected.
These sites are listed in the "Select Site" drop-down list that now opens up.
Selecting a site from this drop-down list and then clicking the "Display This Site" button will open up a display of the selected site.
After viewing that site, you can use the "Return To Select Site" button to return to this page and select another site to view (if your project comprises more than one site).
Back to top
The position of the elements making up the display page may alter according to the size of the screen you are viewing the display on. The respective functions remain the same, however.
A brief outline of the site display components:
Back to top
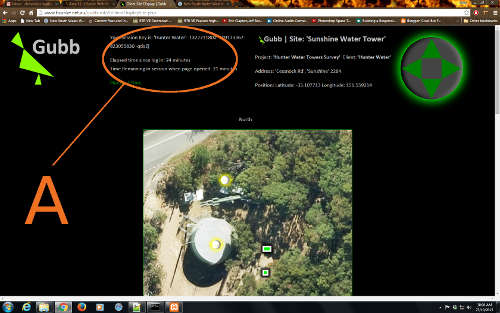
The first section of the Gubb Site Display page (marked "A" on the above image) contains information regarding the session that was commenced when you logged in.
The Session Key is an identifier that is generated by Gubb when you successfully log on. The first part of the Session Key is your Client Name. The subsequent parts are randomly generated sequences numbers and letters that uniquley identify your session.
If you attempt to enter the site display page without going through the login process, this key will not be available and Gubb will not allow you to access the page.
The next two lines in this section display the time that has expired since the session opened - and the time remaining in the session.
The last line is an indicator of time remaining in the session - if more than 10 minutes remain, Gubb displays "Plenty of time" in green.
If less than 10 minutes remain, a warning is displayed that your session will soon expire.
Gubb sessions are set to expire 45 minutes after you log in.
The reason for time limiting sessions is to reduce the possibility of hackers "hijacking" a session when a legitimate user forgets to log out of the system.
It is recommended that users always exit the system by using the "Log Out" button. This closes the current session and ensures it can't be "hijacked". For those who will forget, after 45 minutes the session will be destroyed in any case.
If you are still using Gubb when the session expires, do not be concerned. The page you have open at that time will remain open and functional. When you next attempt to open another page, however, you will be redirected to the Login page - where you have to log in again to continue to use the system.
Back to top
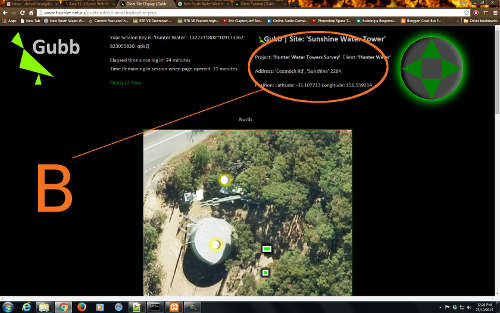
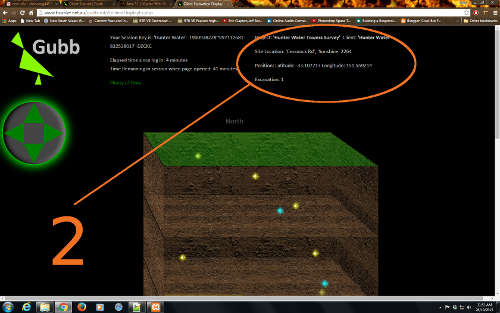
The next section of the display (marked "B" above) shows information about the site:
The project the site is part of, the client for whom the work is done, the street address of the site (where applicable) and the latitude and longitude of the site are all displayed here.
Back to top

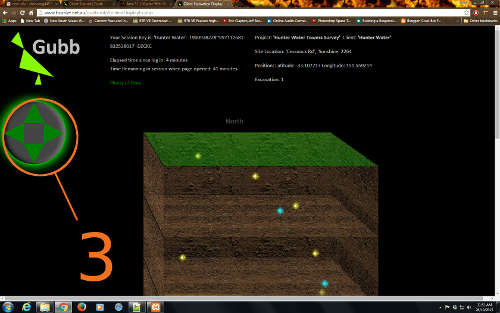
The trackball is used for rotating the image on devices that do not use a keyboard. Instructions for use of the keyboard in rotating the 3D display appear below. The trackball, labelled "C" above, will rotate the display image by 5 degrees each time one of the green arrows on the trackball is clicked (or tapped). The rotation will be in the direction the green arrow which is clicked/tapped is pointing.
To return the image to its default position, click on the "Reset All" button in the Control Panel below the display image.
Back to top

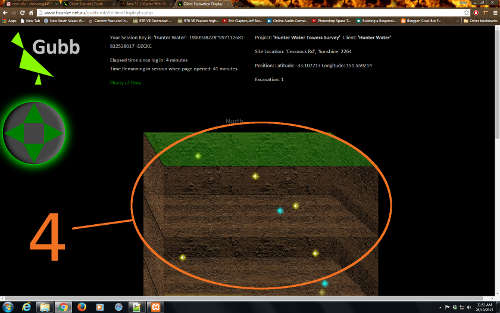
The site image displayed as "D" above includes an aerial view of the site. If no such image is available, the site will appear as a green rectangle which is a scale model of an area including the site in question.
The site image is oriented so that the top of the image, or map, is the northernmost side of the rectangle.
The width and length of the map are to scale and represent the actual relationship between the equivalent components of the actual site.
Back to top
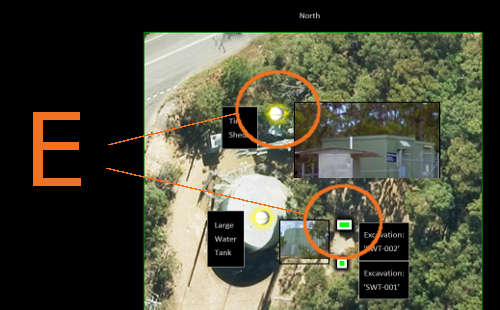
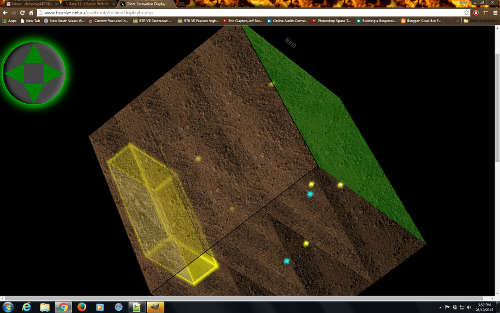
The above-ground artefact icons mark the position of, as the name suggests, above ground artefacts. These can include man made structures and objects found on the site.
The above-ground artefact icon:
To display the label describing an artefact, and an image of it (as shown in the image above), simply click on the icon.
To hide the label and image, click on either the icon or label again. Clicking on the image will enlarge it - click again to return to its original size.
Alternatively, the labels and images can be displayed and hidden using the respective buttons in the Control Panel beneath the image.
Above Ground Artefact icons also display the height of the artefact - the distance from the top of the artefact to the ground at that point. This can be observed by rotating the image as described below.
The excavation icon:
These mark the location of each excavation on the site. The icon is constructed to scale, reflecting that actual size, shape and position of the excavation.
Click on the icon to reveal the label identifying that excavation. The code displayed on the label is used to identify the excavation in the drop-down list below - which is used to select an excavation to display in detail.
Back to top

The display image or site map can be rotated in 3 dimensions.
If the device you are viewing on does not have a keyboard, the trackball on-screen will rotate the image 5 degrees each time one of the arrow shapes on the trackball are clicked or tapped. The trackball arrows rotate the image on the X and Y axes.
On a keyboard, however, the arrow keys (up, down, left and right) also rotate the image on its X and Y axes. They move the image a single degree each time a key is pressed, but if the key is held down, the image will rotate smoothly until the key is released.
The number keys on a numeric keypad will also rotate the image on the X and Y axes: 2=down, 8=up, 4=left and 6=right. Please note, however, that the "Num Lock" must be switched off for these keys to work.
The 2, 4, 6 and 8 keys on the top row of the keyboard character keys (the number/symbol keys) will also rotate the image on the X and Y axes in the same way.
Using the 1 and 9 keys, however, in the number/symbol array, will also rotate the image on the Z axis.
The 1/! key will rotate the left side of the image upwards. The 9/( key will rotate the right side upwards.
Please note, when the image is tilted over, these "upwards" and "downwards" rotations become "towards the viewer" and "away from the viewer" respectively. That is to say, all movements of the image are relative to the original position of the image.
To reset the image back to its original position, just click on the "Reset All" button in the Control Panel. This refreshes the page and returns everything to its default setting.
Back to top
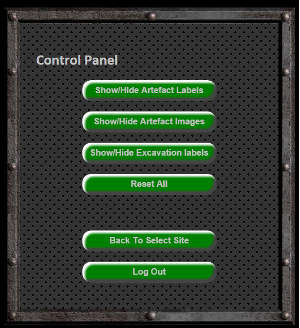
Scrolling down from the display image reveals the Control Panel.
The buttons available in the control panel are fairly self explanatory:
Clicking on the first three buttons, for example, will display or hide all the artefact labes and images, or the excavation labels, as their names suggest.
Note: these images and labels can be displayed for each individual artefact or excavation by clicking on the icon.
The next button is the "Reset All" control. This button refreshes the page and restores everything to the default settings.
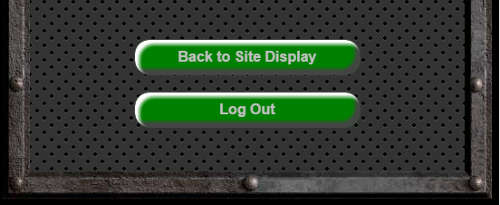
The "Back To Select Site" button takes you back to the Select Site page - where you can select another site to view if the project contains more than one site.
The "Log Out" button closes the viewing session and takes the user back to the login forms.
Back to top
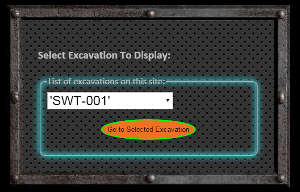
Scrolling further reveals the "Excavation Selection" form. This form contains a drop-down list which presents all the excavations conducted on this site. They are identified by the "exCode" (or name) which appears in the excavation labels on the display image.
Select an excavation you wish to view from the drop-down list and then click the "Go to Selected Excavation" button.
This will close the site display and open a display of the selected site.
Back to top
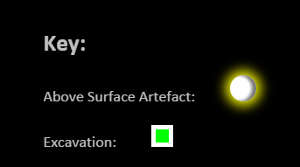
The next section of the Site Display page is the "Key".
This section simply labels the icons which can appear on the display image:
The above ground artefact icon and the excavation icon.
Back to top
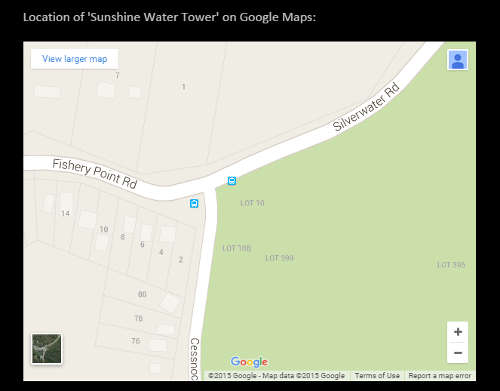
The final part of the site display is an embedded Google Map.
This embedded map is centred on the location of the site, defined by the latitude and longitude of the site.
The user can zoom in and out, enlarge the map and switch to the satellite view.
Back to top
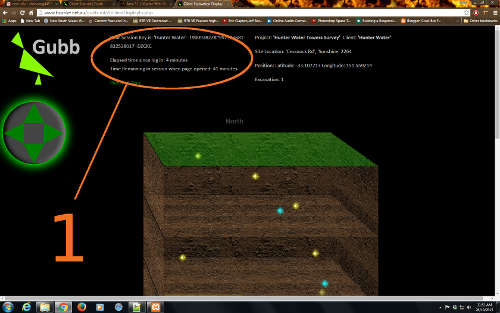
As was the case on the site display, the first section of the Gubb Excavation Display page (marked "1" on the above image) also contains information regarding the session that was commenced when you logged in.
The Session Key is an identifier that is generated by Gubb when you successfully log on. The first part of the Session Key is your Client Name. The subsequent parts are randomly generated sequences numbers and letters that uniquley identify your session.
If you attempt to enter the site display page without going through the login process, this key will not be available and Gubb will not allow you to access the page.
The next two lines in this section display the time that has expired since the session opened - and the time remaining in the session.
The last line is an indicator of time remaining in the session - if more than 10 minutes remain, Gubb displays "Plenty of time" in green.
If less than 10 minutes remain, a warning is displayed that your session will soon expire.
Gubb sessions are set to expire 45 minutes after you log in.
The reason for time limiting sessions is to reduce the possibility of hackers "hijacking" a session when a legitimate user forgets to log out of the system.
It is recommended that users always exit the system by using the "Log Out" button. This closes the current session and ensures it can't be "hijacked". For those who will forget, after 45 minutes the session will be destroyed in any case.
If you are still using Gubb when the session expires, do not be concerned. The page you have open at that time will remain open and functional. When you next attempt to open another page, however, you will be redirected to the Login page - where you have to log in again to continue to use the system.
Back to top
The next section of the display (marked "2" above) shows information about the site:
The project the site is part of, the client for whom the work is done, the street address of the site (where applicable) and the latitude and longitude of the site are all displayed here together with the id number of the excavation record in the Gubb database.
Back to top
The trackball is used for rotating the image on devices that do not use a keyboard. Instructions for use of the keyboard in rotating the 3D display appear below. The trackball, labelled "3" above, will rotate the excavation display by 5 degrees each time one of the green arrows on the trackball is clicked (or tapped). The rotation will be in the direction the green arrow which is clicked/tapped is pointing.
To return the excavation display to its default position, click on the "Reset All" button in the Control Panel below the display image.
Back to top
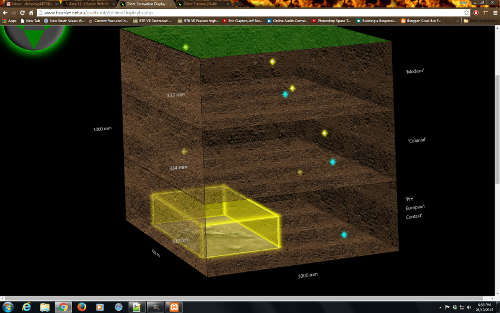
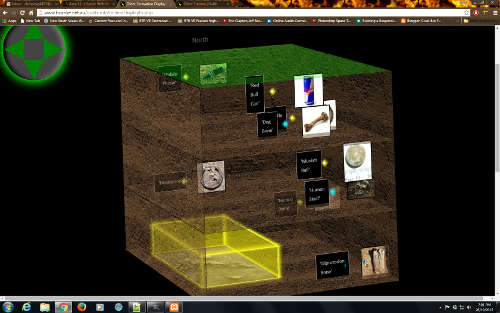
The excavation display is a scale model of the excavation and findings compiled by the Gubb system from information entered into the Gubb database.
The excavation display features icons which delineate between different types of artefacts and artefact fields. These are specified below.
The display madel can also be rotated in 3D to view the results from any direction or orientation.
Back to top
The excavation display is a scale model of the excavation and findings compiled by the Gubb system from information entered into the Gubb database.
The excavation display features icons which delineate between different types of artefacts and artefact fields. These are specified below. The position of the icons is determined by the information entered into the Gubb database.
The display model can also be rotated in 3D to view the results from any direction or orientation.
As with the Display Image (above), the Excavation Model can be rotated using the on-screen trackball as set out in 3 above, or by using a standard keyboard.
The arrow keys on the keyboard will rotate the model on its X and Y axes (up, down, left, right).
The numeric keys (numbers 2, 8, 4 and 6) will carry out the same function provided the "NumLock" key is off.
The number/symbol keys across the top of the keyboard will also rotate the model on its X and Y axes: 2/@ = down, 4/$ = left, 6/^ = right and 8/* = up.
The 1/! key and the 9/( key will also rotate the model, this time however, on its Z axis; that is to say, 1/! will rotate the model's left side upwards while the 9/( key will rotate the right side upwards.
All keyboard keys are set to rotate the model by 1 degree each time they are used. If the key is held down, however, the model will rotate smoothly in that direction until the key is released.
All rotation is relative to the original position of the model, so, for example, when the model is tilted up 90 degrees, using the up-arrow, or 8/* key or the numeric 8 key (or the trackball), then the 1/! key brings the left side of the model closer to the viewer and the 9/( key does the same with the right side.
Back to top
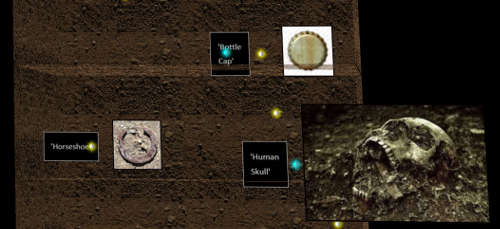
The Gubb system displays two types of artefacts:
a) Inorganic artefacts - referred to as simply artefacts. These are artefacts that have never been organic in nature.
b) Remains - artefacts that are or once were organic in their nature.
The details of each artefact can be displayed by clicking on the respective icon. So clicking will display the label and image linked to that artefact. By clicking again on the image once displayed, the image can be enlarged for closer inspection. Clicking again on that image will reduce its size again.
Clicking (or tapping) on the icon again (or its label) will hide the image and label from view.
The labels and icons for all artefacts can also be displayed and hidden using the Control Panel as set out below.
Back to top
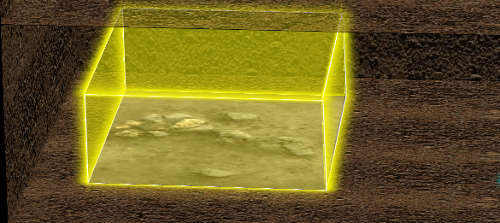
Gubb also displays clusters or groups of artefacts as "fields".
The fields are also represented as "artefact fields" or "remains fields" using the same definitions discussed above.
Each such field is represented as a cuboid (or rectangular prism). If an image of the field is available, it forms the bottom layer of the field model.
Back to top
The Control Panel for the Gubb Excavation Model is directly below the model or display.
The Control panel contains a number of buttons for managing the model as well as navigating through the system.
Back to top
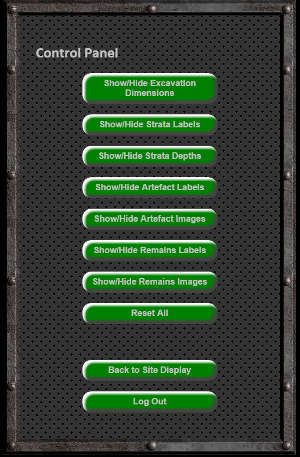
The Control Panel contains a number of buttons which display or hide information about the excavation.
"Show/Hide Excavation Dimensions" for example, displays the overall dimensions of the excavation.
"Show/Hide Strata Labels" shows the names of each stratum or level of the excavation.
"Show/Hide Strata Depths" displays the depth of each stratum or layer of the excavation.
Back to top
The "Show/Hide Artefacts Images/Labels" and "Show/Hide Remains Images/Labels" buttons display all the labels for each class of icon (or hide them) at once.
Clicking (or tapping) these buttons will display all of the respective labels and images or, if they are already displayed, hide them.
The "Reset All" button refreshes the page, returning all settings to their default position.
Back to top
The remaining two buttons in the Excavation Model Control Panel are for navigation within the Gubb system.
"Back To Site Display" returns the user to the site display so that other excavations on that site can be viewed.
"Log Out" closes the current session and returns the user to the login page of the Gubb system.
Back to top
That's all there is to using the Gubb system to review the results or your archaeological project.
It might seem a lot of instructions to operate what is actually a very simple system, but that's a common feature of instructions (or technical writing); the simplest things often take the most explaining.
If you require additional elements in the models and displays, please ask your archaeologist to contact us at Gubb.
We are always keen to incorporate new ideas into the system.
Thank you for using Gubb.
Back to top